February 28, 2018

Hello! How was your February?

A few posts ago I mentioned that I would be archiving my digital paintings, on a monthly basis in just one post, and that I would write a little bit about each piece. You can read my last month's art recap here!

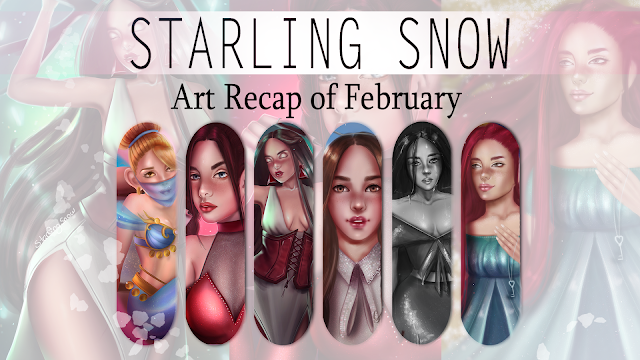
But without further do, between contest submissions and figure drawing practices, here are my finished paintings for this month!

CHROMIE

I'm not entirely happy about this one; however, it's all part of the learning process, right? I decided to paint Chromie on one of her Heroes of the Storm skin. She is one of my favorite characters to play there and I like to paint fan art every once in a while, so that's always a good premise. I actually made a NSFW version of this painting, which I haven't figured out where to post it yet. Well, or if I ever will anyway since I'm not much into this painting anymore :o
 

HEARTBREAKER - Valentine's Day Edition

This was my Valentine's Day themed painting. I didn't want to go the romantic route, instead I wanted to portray someone flirty looking for a date. It's a very simple concept and I thought I would be done in a couple of hours, but nope. There were many twists and turns from sketch to final result that took me quite some time. If you're interested, I recorded the process of this painting and you can watch it  here. :)

MISTY FOREST GUARDIAN

This painting was created quite randomly. I was practicing figure drawing from some references online and I ended up really liking this pose. From that point on, I sketched the rest of the character and here's the final result! I really enjoyed working on this one. I recently posted a step by step process blog post where I break down how I approached this painting. You can find it here!
 

BROKEN 

I haven't made a black and white digital painting in a very long time. This speedpaint took me about 2h30 and my idea was to create a helpless character under the rain, as well as practice painting water effects. 

GIRL PORTRAIT - Contest

This was my first try for a contest where we had to create the new face for a certain beauty brand. I didn't end up submitting this portrait though. The one I did submit I will be able to show once the winner is picked, next month. As I decided to participate only 3 days away of the deadline, I was feeling in a rush which might have shown in my submission, but oh well!
 

DAMSEL

Once again, another speedpaint. On this one, I tried to experiment more with brushes. Sometimes I feel a bit conflicted when it comes to the use of different brushes in one piece. I've read online that the fewer brushes you use the better, so it makes the final result more cohesive.  The last couple of months I've been faithful to my round brush plus airbrush combo, so it was nice to change it up a bit by using my other brushes. 


And that's it for February! I hope you liked it and that you stay tuned for more!

Please subscribe to my blog's newsletter, so you can keep up with my blog posts and follow me on social media!
IG | YT | DevianArt | Tumblr

February 22, 2018

Hello!

Last month, I wrote that I would be making a series throughout this year. So, I decided to go with the birthstones theme and commit to illustrate the birthstone associated with each month of the year.

If you haven't seen my January's birthstone illustration, the Garnet, you can read my previous blog post here. It also includes a process video timelapse of my Garnet's painting!

Now, for this month we have the Amethyst! And for this illustration, I wanted to be very literal with the colour scheme, as well as having a very fantasy look to it, hence why I incorporated the horns that have amethysts on the inside. I also thought it would be cool to have an underground cave looking space with all those gems and have the character there like its her own habitat.

I really hope you like it and that you look forward to my next digital paintings!

Please subscribe to my blog's newsletter, so you can keep up with my blog posts and follow me on social media!
IG | YT | DevianArt | Tumblr

February 15, 2018

Hello guys! How have you been?

As someone who loves seeing "behind the scenes" of digital painting's final result, I bring you another step by step process with commentary of my latest piece.
I haven't done a step by step process breakdown in a while and I've been thinking on making some sort of digital painting tutorial at least once a month. So if you like these type of posts, then please stick around! :) 

Now onto the step by step!

I: First step, of course, the sketch. For these last few months I've been making an effort to actually draw my concept instead of going straight to colour block on Photoshop and just figure out what I want to paint as I go. It keeps my mind a bit organized and with an initial vision to go on from.

II: Here I lay out the base colours I plan on using, to briefly test if they work well or not. The only colours I already had in mind were the ones for the corset and her dress, and the rest of the colours would be whichever would complement these later on.

III: Then I started to work on my base colours by adding some slight shading to create form. For the background I used Curves and came up with that green/blue/yellowish mix of colours that I really liked.

IV: With the Multiply brush mode I darkened the before slight shading, so now there is more contrast between colours. I added some folds to the dress and some details on the limits of the corset.

V: At this point, as things were relatively put together, I was able to turn off the sketch layer and step away from it a bit. As you can see, I made some changes to the face when it comes to the face shape and eyes as I noticed that these were a bit too big and high in the face. I also added the strings of the opening of her corset and placed some more shades to her hair.

VI: The face was once again altered by giving her an oval shaped jaw line and by closing her eyes in order to make her look dreamier. I rendered the fabric of the corset (reference helps a bunch!) and the dress. For the background I used the Overlay brush mode to intensify the colours.

VII: Here I blended her skin, highlighted the face and fixed her chest area, so it looks like it has volume. When it comes to her dress, I painted some details and with the Multiply brush mode, I intensified the shading of her clothes and skin. I also added the tree branch behind her just like in the sketch.

VIII: Looking back, it seems like a big jump from the previous step to this one, haha! But there really isn't; here I just used two adjustment layers, Brightness/Contrast and Colour Balance until I was happy with the overall feel and colours. With a Colour Dodge layer I added many highlights throughout the whole painting (on the hair, body, outfit) and I placed some butterflies on the background so I could fill the entire space.

IX: And here's the final result! I worked a bit on the ambient occlusion and used Brightness/Contrast once again. Also, with a Lighten layer I placed some colour on top of the tree branch so it looked a bit more mysterious and like it belongs to the painting's enviroment.


If you'd like, you can see the final result's full size of this digital painting here on my DevianArt page.

I usually record my process, but this painting was meant to practice and try out some new things. 

However, I frequently post many videos on Youtube showcasing the process of my other digital paintings which you can find here

I really hope you enjoyed this step by step! You can check out previous one I made some months ago here!

I will see you at the end of the week with a new digital painting! 

Have a good one! :)

February 13, 2018

Related Posts Plugin for WordPress, Blogger...