


Hey everyone! What have you been up to lately?
I personally have
been inspired a lot by other artists on DevianArt.
Lately I've been drooling over the digital drawing and painting techniques and polished pieces by
Sakimichan. I've known her work for many years, but only lately I've
been looking at it in a different way - as in aspiring to look forward to
achieve the same results one day.
And
as a consequence of being inspired I started to doodle some things
and experimenting with tools that I usually don't use. I ended up so
caught up in it that I spent hours and hours on it. As it was supposed
to be an experiment I didn't record the process, so I thought I could
share step by steps of it along with some comments and thoughts!

1. Sketch
My sketches are usually really rough. I usually like to go straight to color blocking and work my way from there, but it's always useful to have some guiding lines. Also, I sometimes refrain from sketching because I don't have a clear idea of what I want to paint - and even when I do, it's common for me to alter the initial concept due to new ideas coming up.
Here I was initially going with a princess-like character with flowers around her and nature as a background. But soon what I had pictured in mind took off into another direction!

2. Color Blocking
At this point I start to lay out the colors I want to see on this piece as well as some shy shading colours and lights. For some reason I always fall into the purple/pink/blue color combo trap! These colors are my favorite to put together, so I often use them as my main colors.
3. Initial Refinements
Here I start to paint on top of my sketch layer. I try to give the tree trunk a wooden feel and appearance to it by alternating the light and dark brown lines and color dodging on the side to give the sensation of the end of the day approaching.
The dress has already some deep shadows on and the face features are refined.

4. First Drastic Changes
Making changes can be a hard decision when you've already put effort into something. It can be worth it if you go through it though! I was unhappy with her expression and a simple smile/lips alteration in shape and color was all it took to give a friendlier and warmer look to her face.
The dress I painted her on before didn't feel too princess-like so I changed it into more of a fantasy-ish style.
When it comes to her hair, you can see that I changed it from its initial shape and I start to add hair strands to give the illusion of actual hair.

5. Starting to Look Put Together
Here is when things finally start to look put together! Starting with the dress, I changed the colors to a blue-ish grey muted tone by using color and overlay blending layers and then gave it a voluptuous shape at the bottom.
Volume was also added to the hair along with different blonde tones. This romantic hairstyle gave her a very mellow look which I really liked.
The anatomy was also fixed (shoulders, waist, chin and nose). Now her face features also have some highlights and the skin colour looks more realistic by shifting her midtones to a rosy hue - this was achieved by using the color balance option.
Fun fact: at this point I was painting this giant tall tree behind her and I was thinking that it would be really cool to have this long vertical painting. But then it looked a bit off having the tree take so much attention from the character when zoomed away. So I erased it and augmented her size instead. One day I will explore that option again in another piece!

6. Working on the Background
I decided that this painting would be set at sunset so i painted the background's sky accordingly. With a layer set on multiply I put a shadowy area at the bottom of her dress and around it to give the image more depth.
I was experimenting with some things coming down from the tree and this is what I came up with - some little flowers that lighten up which are a great excuse to use some reflected light on the character thus making her belong even more to the scene.

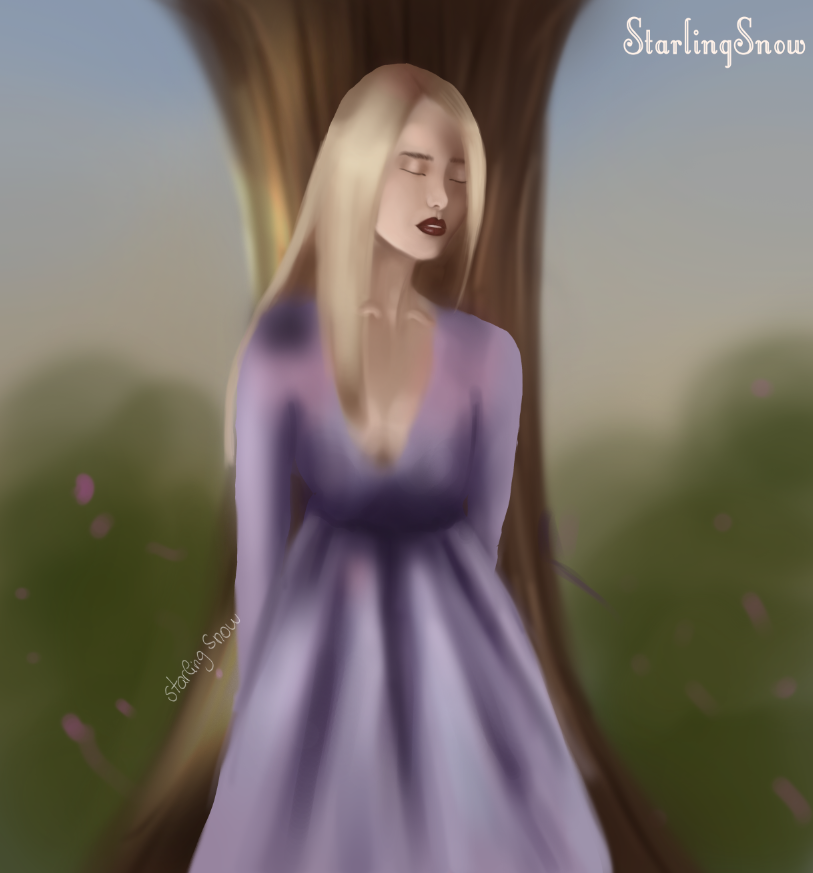
7. Effects and Final Results
At this point all I did was enhancing what was already there. I used color balance, layer blending modes set to overlay, soft light and multiply for shadows, lights and atmosphere, chromatic aberration and gaussian blur around the character. And 4 hours later or so I am done!
__________________________________________________________________________
__________________________________________________________________________
It's been a little bit more over a year since I started digital painting (at first with a mouse!) and it's seriously one of the best things I could have gotten myself into. It's so freeing and fun to explore options and your imaginary to translate it into an image. I'm still just a beginner and I know that there is still a long way to go.
If you want to keep updated for more things to come, please stay around!
__________________________________________________________________________
See you sunday with my newest digital painting timelapse video! :)
- starlingsnow


Nice blog with great posts, just keep going...
ReplyDeleteThank you so much! :)
Delete